I finally was able to finish another easy craft for summer that I’m excited to share with you. I’ve mentioned so many times that my favorite thing to do is walk for hours along the ocean mostly on the Jersey Shore beaches to forage and find treasures.
When the tide is just right, I occasionally find a lot of live mussels. And I love cooking them for a delicious dinner. Some of you might frown upon finding these and then cooking them but we haven’t gotten sick yet. They taste delicious and are super healthy.

This time I decided to make a mussel shell craft with the shells after our dinner instead of discarding them (Read more about Jersey Shore mussels and their health benefits). So I made a seashell flower mussel protea or mussel artichoke which I occasionally see in my Pinterest feed. I haven’t found any tutorials for them though so I decided to make one for you.
I love how the seashell flower turned out and this mussel shell craft is easy to make. I ended up making several of them. They would make great gifts too and barely cost you anything.

DIY mussel shell craft that looks like a protea flower
This post may contain affiliate links from which I will earn a commission at no extra cost to you. View my full disclosure policy.
This is such a fun seashell craft project and a great way to use all those mussel shells!
Supplies needed
- mussel shells in various sizes
- bleach and bleach-safe container
- water
- strainer
- seashell glue or hot glue gun and glue (I tested both and prefer the hot glue)
- tweezers
- wooden stick or driftwood (I found my sticks in our yard and they are around the size of my pinky)
- clear varnish like polycrylic (optional)

Video tutorial
It always helps to watch the video tutorial to see what my hands were doing and to get more explanations and details. If it doesn’t load here on my blog then you can also head over to my YouTube channel to watch instead.
Step-by-step instructions for this mussel shell craft
For this mussel shell craft, you can leave the mussel shells intact the way you find them on the beach where they usually have a dark color, or you can reveal the blue color in various stages. Let’s get to it and let me show you what I did.
Step 1: How to bring out the blue color of mussel shells (optional)
First thing, you need to decide if you want to bring out the blue color of the shells.
Most seashells and mussel shells included are coated in a thin brownish-black layer called the periostracum. It is a protective layer that also hides the beautiful blue-gray color of the mussel shell. You can remove that layer which is a bit tricky though. I tried my Dremel first with a buffing/fine sanding attachment. That was very tedious and broke the shells very easily.
After that, I tried a 50/50 bleach and water bath over several days which worked much better. It however leaves the shells even more brittle than before. After the shells were bleached, I poured the solution into a strainer in my sink and rinsed the shells thoroughly.
Always be careful with bleach fumes and that it doesn’t splash on you! It is a good idea to do this outside for sure.

I tried several different stages of bleaching and there is a big difference in results. Below is a photo of the mussel shells that I bleached for several days until the entire brown protective layer was removed.

And below is a large tray full of mussel shells that I only bleached for a day and a half. There are still spots of the brown protective layer remaining but the mussel shells are a bit more sturdy that way.

Step 2: Sort mussel shells by sizes
I found it helpful to sort the mussel shells according to size before starting to glue and shape the flower.

Step 3: Start gluing mussels to stick
Start by picking two of the smallest mussel shells and then glue those together onto the stick as if it is still a closed mussel. Then work your way outward with single bigger shells.

This is where you have to play around a bit with shells and shell sizes. It helps to keep looking at the flower bud shape from the top.
As I mentioned earlier I tried the seashell glue which worked great but I didn’t like waiting until the glue dried which is why I liked using the hot glue better. It can get a bit tricky though and I burned my fingers a couple of times. So be careful!

TIP: Once in a while, you have to take a break until the hot glue has cooled off.
Step 4: Keep gluing shells downward on the stick
As you keep shaping the flower you have to keep moving downward with larger mussel shells glued to the stick.
Occasionally, if the gaps are too big you can glue and insert smaller shells into the gaps.

Step 5: Use tweezers to remove glue strands
Lastly, I used small tweezers or my fingers to remove all the fine glue hairs from the seashell flower. Hot glue tends to leave a lot of those fine glue hairs behind.
Below is a close-up of the glued seashells where you can see some of those fine glue hairs that I am talking about. It’s almost impossible to remove them all. If they bother you then I suggest that you use the seashell glue instead.

RELATED: Here is another great seashell craft idea. How about some seashell tassels using various clam shells or tea light candles in seashells or seashell candles? Both are so pretty and easy to make with all your collected seashell treasures.


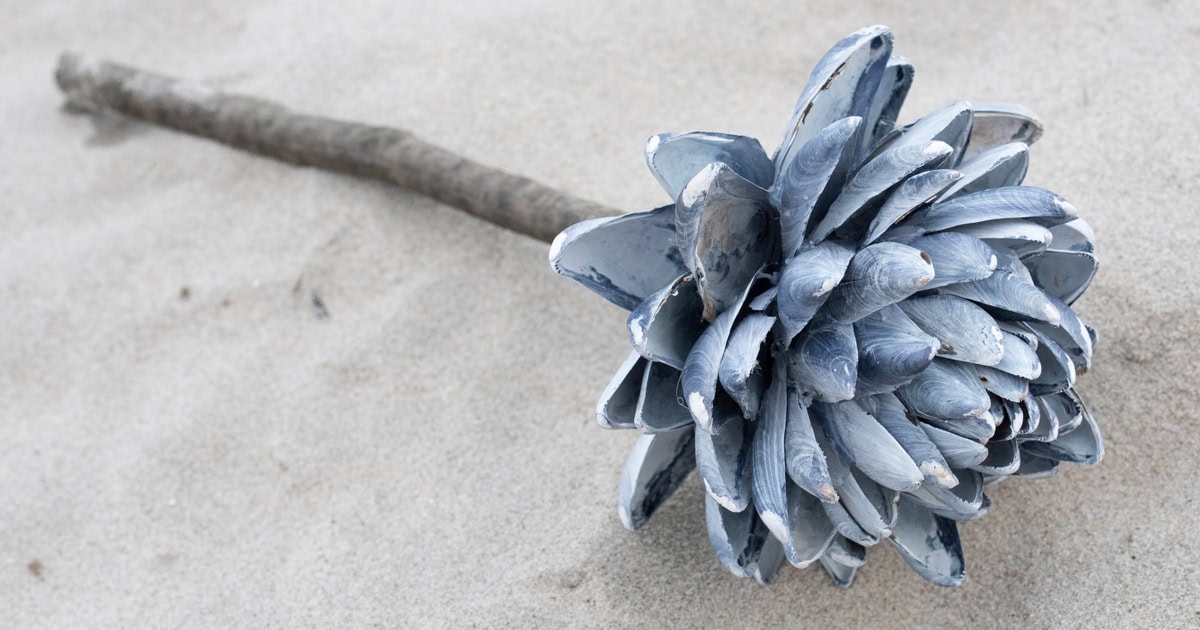
Photos of finished mussel shell protea flower
Just look how pretty the muted blue tones look with the sand and ocean as a backdrop. I can’t wait to use them as home decor.


In the next photo, you can see that I didn’t bleach the shells of the left flower as long as the shells of the right flower since they still have brown on them. Which version do you like better?
You can put a clear varnish on them like polycrylic. I’ve tried it but you don’t have to. Some people apply oil like mineral oil to the mussel shells (no food-grade oils) to bring out the blue color but that can be a big issue when you try to glue them so I didn’t.

I had a lot of fun photographing them. You can tell that I love how they turned out.


I had my husband take a photo of me. Doesn’t happen too often these days anymore. We also got some nice family photos.


Tschüß,

Notes
- The seashell glue worked great but I didn’t like waiting until the glue dried which is why I liked using the hot glue better. It can get a bit tricky though and I burned my fingers a couple of times.
- The bleaching time does affect the brittleness of the seashells so be careful.
- You can use varnish but it doesn’t really affect the overall look of the seashell flower.
- Once in a while, you have to take a break until the hot glue has cooled off.