
Regardless of how big your home is you never seem to have quite enough space for storage, for preparing food, for dinning etc. Somehow whenever you create a little space for any of these tasks there’s always something waiting in the wings to fill it and once in place there it remains.
When it comes to working in the kitchen and preparing food often chopping boards are placed on cookers etc. or when dinning this often means the only option is your plate on your lap on the sofa.
To remedy this problem and ensure that you always have an actual table to sit and eat at a great solution is a folding or dropdown breakfast bar. As a table such as this folds away it’s not left up long enough to get stuff stacked all over it and also as it folds, if space is limited it also won’t get in the way, the idea solution in all respects.
With the above in mind, in this DIY guide we will show you how to construct your very own folding breakfast bar or dropdown work surface.
How to Build a Folding Breakfast Bar or Worktop
Building an additional work surface or breakfast bar is a pretty straight forward DIY job and one that can be undertaken by anyone with a little DIY experience. The only tricky aspect of this project is sourcing an additional section of worktop to match your existing one.
Fortunately when it comes to worktops designs don’t tend to vary too much and even though you may not be able to find an exact match you are pretty much certain of finding something very close.
Where is Your new Breakfast Bar or Surface Going to go?
Before installing any new dropdown worktops or breakfast bars the first job is to decide where your new surface is going to go.
Ideally this will be against an existing worktop or work surface in an area with plenty of space around it to allow for ease of working or sitting.
Additionally, one further consideration is the orientation of your new breakfast bar e.g. are you going to position it using the length of the worktop or it’s width.
By this we mean are you going to butt the new dropdown to the existing surface along its 600mm width or along its full length, normally either 2m, 3m or 4m.
In the majority of cases this will be decided by the shape of the worktop you are using. Most standard laminate worktop is either square edge or bullnosed (rounded at the front) and aligning a square edge against a rounded edge can look a bit odd and out of place, but if you are not bothered by this then feel free to align which ever edges you please.

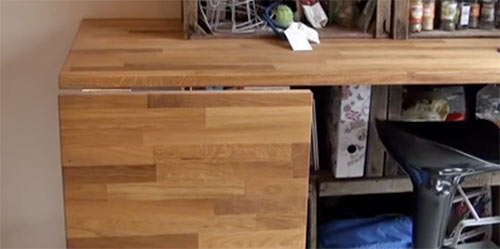
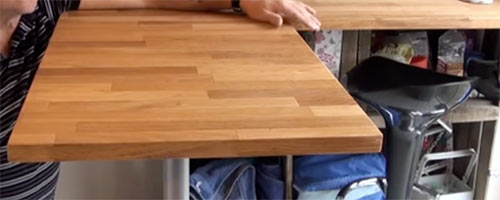
Existing work-surface with dropdown attached
Source Matching Worktop
One of the trickiest parts about this DIY project is selecting the type of worktop or surface you are going to use for your dropdown. On pretty much all occasions the most obvious option is to choose a surface that matches your existing surfaces and in most cases this is probably what you will want to do.
If your kitchen is fairly recent (last 5 or so years) then sourcing a section of worktop to match your existing work surfaces shouldn’t be too much issue.
However fashions and tastes change like the wind and if your kitchen is fairly old, the chances are that your particular design may have gone out of fashion and thus been discontinued so unless you’re lucky enough to find a supplier that carries “new old stock” or reproduces old designs your out of luck.
In this instance you do have several options, the first being change all of your existing worktops to match or find a design, colour scheme etc. that matches your existing work surfaces as closely as possible and use this.
In the majority of cases the latter is usually the most popular choice due to the expense of changing all your existing work surfaces just to match your new additional dropdown.
Ultimately there is no right or wrong answer here, just go with what you like. In our example here as the existing work tops are straight forward hardwood they were pretty easy to match.
Dropdown worktop matching existing work surface
Decide how big Your Surface will be
The next job is to decide how big your new work surface is going to be, In most cases this will be the length as pretty much all work surfaces come at 600mm width, so unless you require your worktop to be less than 600mm in width you will just need to settle on how much of your existing work surface your new surface is going to be attached to you want to cover.
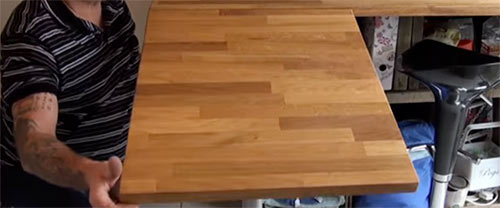
In the case of our example here as the existing work surface we are attaching to is rather small we’re only going to make our dropdown attachment 450mm in width.
To gain the maximum amount of usable space in our example here we kept the dropdown section to its standard width of 600mm.
One other consideration here is that you also have to ensure that you have enough height in your existing work surface so that your new dropdown section can indeed drop down without fouling the floor.
In pretty much all cases you should be fine as most worktops will be somewhere between 850mm and 900mm in height, more than enough to allow for a drop of 600mm.
Once you have settled on exactly how big your new dropdown breakfast bar or work surface is going to be the next job is to cut them to size. If you’re using a solid wood worktop then this can be done using a handsaw (how to cut timber using a handsaw), jigsaw () or circular saw ().
However if you are using a laminate worktop this is a little trickier as during cutting you don’t want to splinter, crack or chip the laminate coating. To prevent this happening, if you are using a circular saw ensure that you turn your worktop upside down and cut from the back edge to prevent the rotating blade causing blowout.
If you are going to use a handsaw the best methods to get a straight and level cut is to mark your cutting line and then clamp some straight timbers either side of your cutting line, leaving about a 2mm gap to allow the blade to travel down top and bottom to create a channel guide and then simply cut between the guide lines.
Once cut use a suitable sander or piece of sandpaper top run over all the edges and corners and bevel them off so that there are no acute points that can cause injury.
Breakfast bar dropdown cut to 450mm in length
Fix Hinges and Table/Work Surface in Place
With your new dropdown surface cut to the correct size the next job is to fix it in place on your existing work surface.
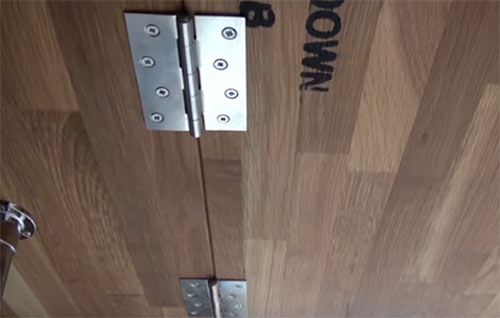
To do this we are going to use 2 four-inch butt hinges as these will provide a good deal of fixing area and space.
To fix them in place, flip your new dropdown surface over and then measure and mark in 2 inches either side. The edge of each butt hinge will be fixed in from each of these marks.
Position your first hinge on the mark you made above and ensure that the hinge knuckles (the interlocking cylindrical sections that the pin runs through) over hangs the back edge and then mark each fixing hole with a pencil.
Put the hinge to one side and then use a 2mm pilot drill to drill out some pilot holes taking great care not to drill in too far and pierce what will be the top surface.
Once drilled out position your hinge back in pace and the use suitable wood screws to secure the hinge in place. In this case we used 8x 20mm wood screws as the work surface we were using was only 28mm in depth.
Repeat the above for the second hinge also.
Once the hinges are fixed in place on the new dropdown breakfast bar it can now be fixed to your existing work top. For this borrow a second pair of hands to hold the dropdown in eth exact position that you want it to be fixed at and then crawl underneath and position the hinge knuckles to that they overhang the worktop edge slightly, ensure both hinges are exactly level and then mark through each fixing hole in each hinge.
Once marked again, drill out a pilot hole in each ensuring you don’t drill too deep and then screw each hinge through each fixing hole using suitable wood screws.
Dropdown breakfast bar fixed to existing worktop
Attach Support Leg
One of the final jobs now is to fix the telescopic central support leg in place that will hold the dropdown upright and level with your existing surface. There are many different methods and solutions to this, and in our example here we are using an telescopic support leg that we purchased from Ikea, although similar products are available from many different outlets and online stores.
To fix the leg in place, first measure in from the front edge roughly around 200mm somewhere around the centre and then measure and mark the centre across the width of the dropdown and finally mark the point that the 2 lines intersect with each other. The centre of your support leg will be fixed over this point.
Once marked, position your support leg in place and ensure it’s central to the width of the dropdown by using a tape measure. Once positioned mark all the fixing holes, drill pilot holes and then fix the support leg in place.
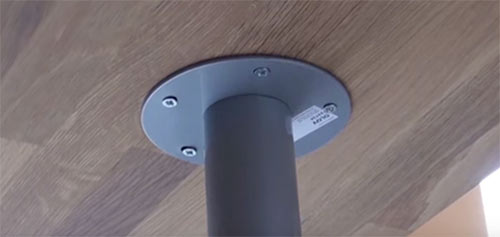
Support leg fixed to underside of dropdown breakfast bar or worktop
Once fixed, extend it downwards until touches the floor and ensure the dropdown section is level before locking it off and then stand bask and admire your handy work!
Completed dropdown breakfast bar or worktop
Dropdown Worktop or Breakfast Bar Finishing up
Once you have completed all of the major construction work for your new dropdown breakfast bar there are a few finishing touches that should be completed.
If you have opted to use a laminate work surface changes are you have some bare edges that could do with covering over and finishing off.
If this is the case then see our project here on how to fit worktop edging strips for information on how to finish off these bare edges.
If however you have opted to go with a solid wooden worktop, to ensure it stays in tip-top condition and remains water and stain resistant you should treat it with a decent quality Danish Oil. This should be repeated every few months or so.
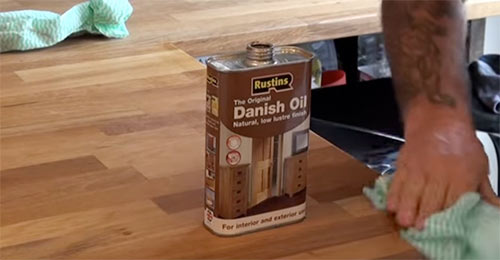
Treat dropdown surface with Danish Oil
Constructing a dropdown worktop or breakfast bar in your kitchen is a fantastic way of adding an additional surface for either eating or preparing and one that can easily be folded away so that you don’t loose any much needed space in an already tight area.