The German folk art painting technique called Bauernmalerei is a traditional folk art that can be replicated with a few templates and simple brush strokes. It reminds me of my childhood in Germany and watching my mom paint. Let me show you how you can paint your own easy folk art for beginners.

DIY easy folk art called Bauernmalerei with flowers
This post may contain affiliate links from which I will earn a commission at no extra cost to you. View my full disclosure policy.
Growing up in Bavaria, Germany, in the 70s and 80s, my mom had a painting hobby that she started in the early 1970s. It is called “Bauernmalerei”. If you are wondering what that means, “Bauern” are farmers, and “Malerei” means painting. It is a traditional German primitive folk-style painting technique. German Bauernmalerei, experienced a surge in popularity in the 1970s so not only my mom was interested in it. This folk art style supposedly originated in the Bavarian Alps which is why some people here in the United States call it “Bavarian Folk Art”. However, it was definitely perfected throughout the Austrian and Swiss Alps as well.
This folk art spread throughout Europe and I’ve seen many similar variations in Scandinavian and Eastern European countries.

It typically features floral and fruit motifs, as well as birds and other animals painted in bright colors on wooden or even metal objects such as furniture (Bauernmöbel), plates, boxes, and metal milk jugs. Bauernmalerei’s popularity (just like macrame) in the 70s was due in part to the rise of the hippie movement and a renewed interest in traditional crafts and folk art. I feel like this type of painting technique is on the rise again. I own several clothing pieces with floral designs like it.
While I didn’t like it at all growing up, I recently have been finding myself increasingly drawn to it again and it has been on my list to try it out for myself. It’s been a while time since I painted anything.

Every time I traveled home I searched for a vintage book at thrift shops about Bauernmalerei but couldn’t find one. I recently found one here in the US on Etsy and I bought it right away.

Books like this have great inspiration and also come with patterns that you can use. You can see similarities to the flowers and shapes used in the pattern I painted.

Beautiful pieces with folk art found on Etsy or other retailers
I have seen more and more similar pieces for sale on retailers like Etsy or even large retail sites like World Market and Target. I like those items to inspire me and then create my own. If you rather buy something finished then check out the things I found below.

Supplies needed for folk art paintings
- different sized small artist brushes
- primer (I used waterbased primer by Kilz)
- acrylic paint or regular craft paint (I used this FolkArt paint set)
- painters tape
- pencil
- white carbon transfer paper
- a folk art pattern design or template if you don’t want to freehand your design (this is the pattern I used and here are some good websites that offer more designs: )
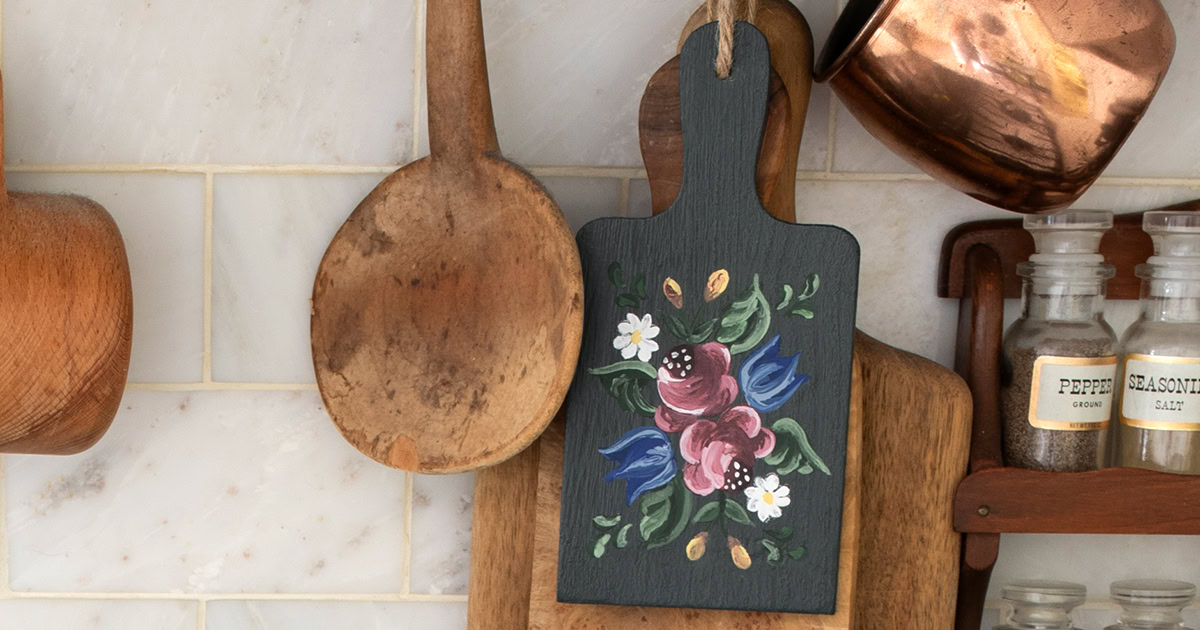
- wooden cutting board, mine was in the clearance section at Joann’s Fabric for $1.50 (or candle sticks, trunks, small wooden boxes, flower pots, canisters, wooden hangers, wooden mugs, or many other items of your choice)
For the backdrop, I used the leftover dark green paint from my son’s dark green bedroom walls for the base color of the cutting board. This green almost appears black sometimes and other times when the sun shines on it, it appears much lighter.
Video tutorial
I made a video for you so you can better see what I did. If it doesn’t load for you then you can also watch it on my YouTube Channel instead.
Step-by-step drawing guide instructions
When you paint this type of folk art (or any type of folk art for that matter) it’s not about making the artwork look realistic which is why this is easy. It is about layering different shades of the same color with simple brush strokes. So don’t overthink it.
You can also see that my mom painted the same type of flowers a bit differently on her big metal milk jug.
Prime and paint your object
It is always a good idea to prime your pieces before painting. Especially in this case, the wood was very porous and it was important to prime it first. When you paint something a dark paint color, it is always better to use a gray tinted primer but I only had this one and it worked ok too.
After the primer dried, I applied two coats of the dark green paint with a broad brush and let it all dry.

Transferring the folk art pattern design
I scaled the pattern design that I chose to fit my cutting board and printed it. Then I cut it out and taped it to the center of the cutting board with painter’s tape. Before moving on, I also slipped a piece of white carbon transfer paper under the pattern copy.
After that I used a sharp pencil to trace the pattern and the carbon transfer paper imprinted the pattern onto the cutting board. Remove your copy and transfer paper to reveal the transferred design.
TIP: You can find patterns on Google and Pinterest. There are so many that are easily scaled and printed. The resolution doesn’t need to be clear and can be blurry since you only need the design for tracing.

Painting the folk art design
This part of the project is of course best demonstrated in my video but I will try to explain it here with words and photos as well. I also recommend practicing on a piece of paper ahead of time the way I did as well. (I love this black paper for this)

Paint the daisy flowers
I started with the small daisy flowers since they were the easiest. You can see the size of the brush that I used. It is very important to use the right-sized brush. The brush set that I have has all the right-sized brushes and is great quality too.
For the white daisy petals simply start at the top of a flower petal and then lift the brush towards the center to create the tip of a petal. Then dab a dot of yellow paint in the center.

Paint the leaves
The FolkArt craft paint set that I have has different shades of green, so I started with the darkest one and filled in the leaf shapes. As you can see the color is very similar to the base color of the board but that’s ok.
You don’t necessarily have to wait until the paint is dry all the way because it’s ok if the different shades of paint mix. So do whatever you like. I used three different shades of green with the last one having a bit of white mixed into it as well as you can see in the third image. Simply repeat the same brush strokes as you did with the daisy petal shapes.

Paint the Roses
The two center circular flower buds resemble a Tölzer Rose and they are always in a red or redish pink. Just focus on the roses when looking at what I am doing. I jumped from flower to flower while letting some of the paint dry. Especially the red didn’t cover well and I had to paint more than one coat which is why I wanted the paint of the rose to dry in between.
The FolkArt paint set also has several shades of red. I started with the darkest red to paint the top circles of the rose first. Then I used the bright red to paint the body shape of the rose.
I mixed some white into the bright red and went over the shape of the rose with the same type of brush strokes as I did for the daisies and leaves.
To finish the roses, I used white paint to add some small white dots to the dark red circular top of the rose.

Paint the Tulips
The same painting technique is used for the tulip shapes as well. I started with the darkest blue and then layered two lighter blues on top with the same type of brush strokes. Once you’ve done this a couple of times, you really get the hang of it.

Paint the small flower buds
All that’s left to do is paint the small flower buds of this particular pattern. I used yellow and tan with the same type of brush strokes.

Add antiquing glaze (optional)
When my mom used to finish her projects, she always added a brownish antiquing glaze to her finished painted pattern to make it look old. I opted not to do it in this case because I liked the way it looked and I also didn’t want it to look dirty.
Here are some finished glazes you can use in case you don’t want to mix your own:
The simplest way to mix your own is by combining water and a bit of brown paint to create dirty water and wipe that on your project with a rag. Or you can use brown wax on your project instead of a glaze.
I also painted a pumpkin like this for fall and am also planning to paint some Christmas ornaments. It was just easier to show you the process on a flat cutting board. I will add photos here once I finish those projects.

Some of the other flower designs were in the book and I decided to use them. I also added black to the leaves.


RELATED: I have many other DIY projects in our kitchen which are the DIY kitchen utensil rack behind the stove. And speaking of the stove, check out my DIY stove makeover and my other vinyl wrap appliances to make them match my lower cabinet color.
How to repair peeling laminate cabinets to make them look like new. My cabinets are 24 years old and I even figured out a way to DIY drawer pulls to fit any existing holes for cheap! How to install a marble backsplash which has held up great by the way.
Or how about the macrame towel holder on the stove handle for some added charm.
And on the other side of the kitchen I made an under sink curtain without sewing.


If you are new to my blog, then you might not know my dining area right next to the kitchen island where I recently added 4 new (old) chairs for $25 from Facebook Marketplace and wrote a blog post about how to repair a rush seat.
RELATED: If you like different folk art then you might also like my DIY Mexican Christmas ornaments. That painting style and technique can be applied to the same project as this one too.

Tschüß,
