
That’s not hyperbole. Our home gym floor is destroyed. And I fear that the only fix at this point will be to tear up the whole thing, down to the floor joists, and replace the subfloor and flooring. And the frustrating thing is that I have no idea what caused it. I’m still searching for answers.
So let me back up and start from the beginning. Last summer in central Texas was brutal. We were in drought conditions. The lake where our city’s water supply comes from was dangerously low. We were on water rations. And it was an incredibly hot summer (standard for central Texas). It was easy to spy those people ignoring water rations because they had beautiful, lush, green grass. Everyone else’s was brown and burned from the sun and heat.
And that’s when I started noticing what I thought was a foundation problem in our home gym. There was a high place in the floor. Being on a pier and beam foundation, I thought that it was a pier pushing a beam and floor joist up too high. Or rather, I thought it was the heat and drought causing the perimeter of our foundation to sink, leaving the high point in the middle of the room. It got bad enough that I thought I had better start watering our foundation before it causes some serious damage.
So I bought some soaker hoses and a timer for our outdoor spigot, and set it up to turn on during the night on those specific days when the ration schedule permitted. But it didn’t get any better. I thought the only hope we had was to get some rain. If only we could get a really heavy rain for a few days, that would plump up the soil around our house and maybe bring foundation back up. But we didn’t get any relief from the drought in the summer.
We finally did get rain , and a lot of it, in October. Seemingly, in about two days, our lake went from dangerously low to gloriously full, rising 15 feet in all. The drought was over, and we could all breathe a sigh of relief. I thought for sure that the rain and swelling ground would make the floor issue go away. But it didn’t.
Fast forward to this summer, and the problem only got worse. The problem in the floor went from a bump to a hill. It got so high that I actually tripped on it last week. So I called a foundation company and scheduled an appointment. They’re supposed to be here at noon today.
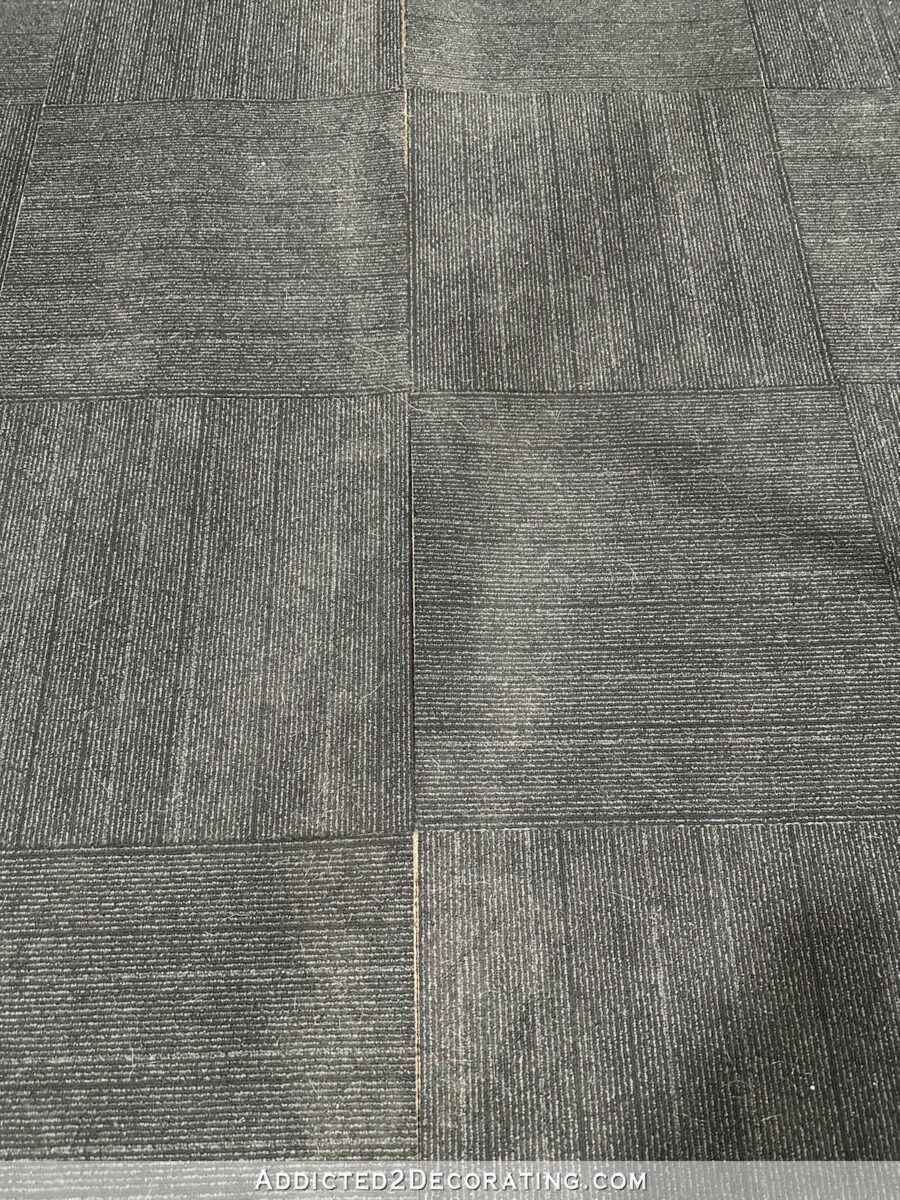
But last night, I decided to take a closer look. Can you see where these carpet tiles are separating? That’s the hill in the floor that’s causing that.

If you look at the carpet tiles with the stripes going towards that middle seam, you can see how the stripes curve upward. It’s curving up on the hill.
And it goes the entire length of the room, from the master bathroom door to the front window, although it’s not so bad on the door side or the window side. It gets progressively worse as you move towards the center of the room.

This is what I tripped on last week. This isn’t a rogue carpet tile that just needs to be secured down. This is the carpet tile lying as flat as possible on a hill in our floor.

I know it’s hard to see when you’re not looking at it in person, so I got this scrap board and placed it on the hill. I mean, this is awful. This is painful to look at for me.

So last night, after taking those pictures above, I decided to take up some of the carpet tiles to see what damage this was doing to the floor. If you followed this home gym remodel, you know that I opted not to do the floors at that point. I decided to just cover them with the carpet tiles and move on. I knew that these floors would need to be replaced eventually, but what was going on right now was clearly not just affecting the floor. It was also affecting the subfloor. So I wanted to get a better look at what was going on under those carpet tiles.
I took them up, and my heart sank. There was moisture under the carpet tiles. How in the world was there moisture under the tiles? This room doesn’t have any plumbing in it! What is going on here? And just take a look at the hill.

You can see these patches of moisture, with even more moisture in the seams between some of the floor boards.

So I took up more tiles, and I found even more patches of moisture.

So this doesn’t appear to be a foundation problem at all. The pier, beam, and floor joist seem to be just fine. They’re doing exactly what they’re supposed to be doing. The problem is that moisture has caused the subfloor and flooring to basically warp around both sides of that floor joist. This isn’t the only one where this is happening, but it’s definitely the worst.

So the main issue is this area that goes right through the middle of the home gym floor…

The bathroom floor is perfectly fine. Most if the issues are in the home gym, but there is one high place (which is still a hump, and not a hill yet) in the guest bedroom.
At this point, I have no idea if I need a foundation company, a construction company, a plumber, or all three. I have no idea what’s going on, but we’re starting with the foundation guy and we’ll go from there. I really just need someone to crawl underneath the house to take a good look and tell me what’s going on under there. And that won’t be me. I’m a pretty bold DIYer, but I’ve vowed that the one thing I will never do is crawl underneath our house. So someone else is definitely going to have to figure this out for me.
In better news, I have resolved my deadbolt issue that I shared in this post. I decided to just switch out all of our deadbolts. I’m sure many of you will be happy and relieved to know that we no longer have double cylinder deadbolts. I now have this sleek square Kwikset deadbolt in matte black. And I bought enough for our other doors, also. (This door obviously needs a new coat of paint, and that sad handle needs the paint cleaned off of it, so pay no attention to those things right now. 😀 )

I know this is stupid and I shouldn’t have done this, but after writing my post about my Schlage deadbolt issues, I kind of put it out of my mind. I still couldn’t get the door open, and I knew I needed to get it fixed, but I just got used to going in and out of the back studio door.
And then when I was at lunch with my mom on Wednesday, I remembered that I still couldn’t get the front door open, and I had my church group coming over that evening at 5:30! So when I got home at 4:30, the first thing I did was grab a screwdriver to remove the deadbolt. I figured I would just take it off completely and then put it back on. With the other two, that always seemed to fix them, at least temporarily. Uninstall, reinstall, and it would work for a few more months.
So I removed the front and back pieces of this one, with only the bolt and its housing remaining. But I couldn’t get it out. No matter what I did to jiggle, turn, or twist that thing, the bolt remained extended and locked into place. It wouldn’t budge.
I sent a group text to my group telling them that I couldn’t get the front door open and they’d have to come in through the back door, and immediately, my friend Julie texted back and said, “Is it the deadbolt again? Steve [her husband] is on the way over.” I don’t know what I’d do without this group of amazing and faithful friends. They have helped me with so many things, and one of them is always ready to come help at the drop of a hat.
So Steve came over, and he evidently had more experience with this type of thing, because after trying to get it out all of the ways I had tried, he finally felt on top of the bolt housing (on the part that’s inside the bored out hole in the door) and felt for some kind of switch or something like that. After moving a little plastic piece aside, he was finally able to get the bolt to retract, and we could finally open the door.
After everyone left that evening, I thought about putting the deadbolt back on for the night and dealing with it the next day, but when I picked it up, metal pieces started falling off of it.

This is very similar to what happened with the first one, except that it was different parts. On the first one, tiny little metal pieces (not shavings, but actual parts of the deadbolt) tumbled out into my had. And this time, these two metal pieces came off, and I had no idea how to put this back together, or if it could even be put back together and function properly.
So I think I’m just done with Schlage. Having three deadbolts all fail in the same way doesn’t make me feel confident in using them. Hopefully I’ll have much better success with Kwikset. Plus, I love the square shape of the new ones. Y’all know how much I love squares and rectangles! Squares and rectangles beat circles and ovals any day of the week in my book! 😀

Addicted 2 Decorating is where I share my DIY and decorating journey as I remodel and decorate the 1948 fixer upper that my husband, Matt, and I bought in 2013. Matt has M.S. and is unable to do physical work, so I do the majority of the work on the house by myself. You can learn more about me here.