Do you love vintage and antique paintings? Check out my simple method to make cheap or free art prints look like exquisite paintings without the hefty price tag using a few affordable supplies. You might even have everything on hand, and this DIY art project won’t cost you a thing.
If you aren’t new to my blog then you know that I’ve done this same type of project numerous times already over the years with different yet similar looks. It’s pretty much always the same approach. More to that later in my tutorial.

How to make a print look like a painting (using cheap supplies)
This post may contain affiliate links from which I will earn a commission at no extra cost to you. View my full disclosure policy.
Supplies needed
- various sized brushes
- frames (I found mine at the thrift store for $2-$3 each)
- cheap or free prints (I bought mine for under $5 on Etsy but you can find some for free too. More about that later)
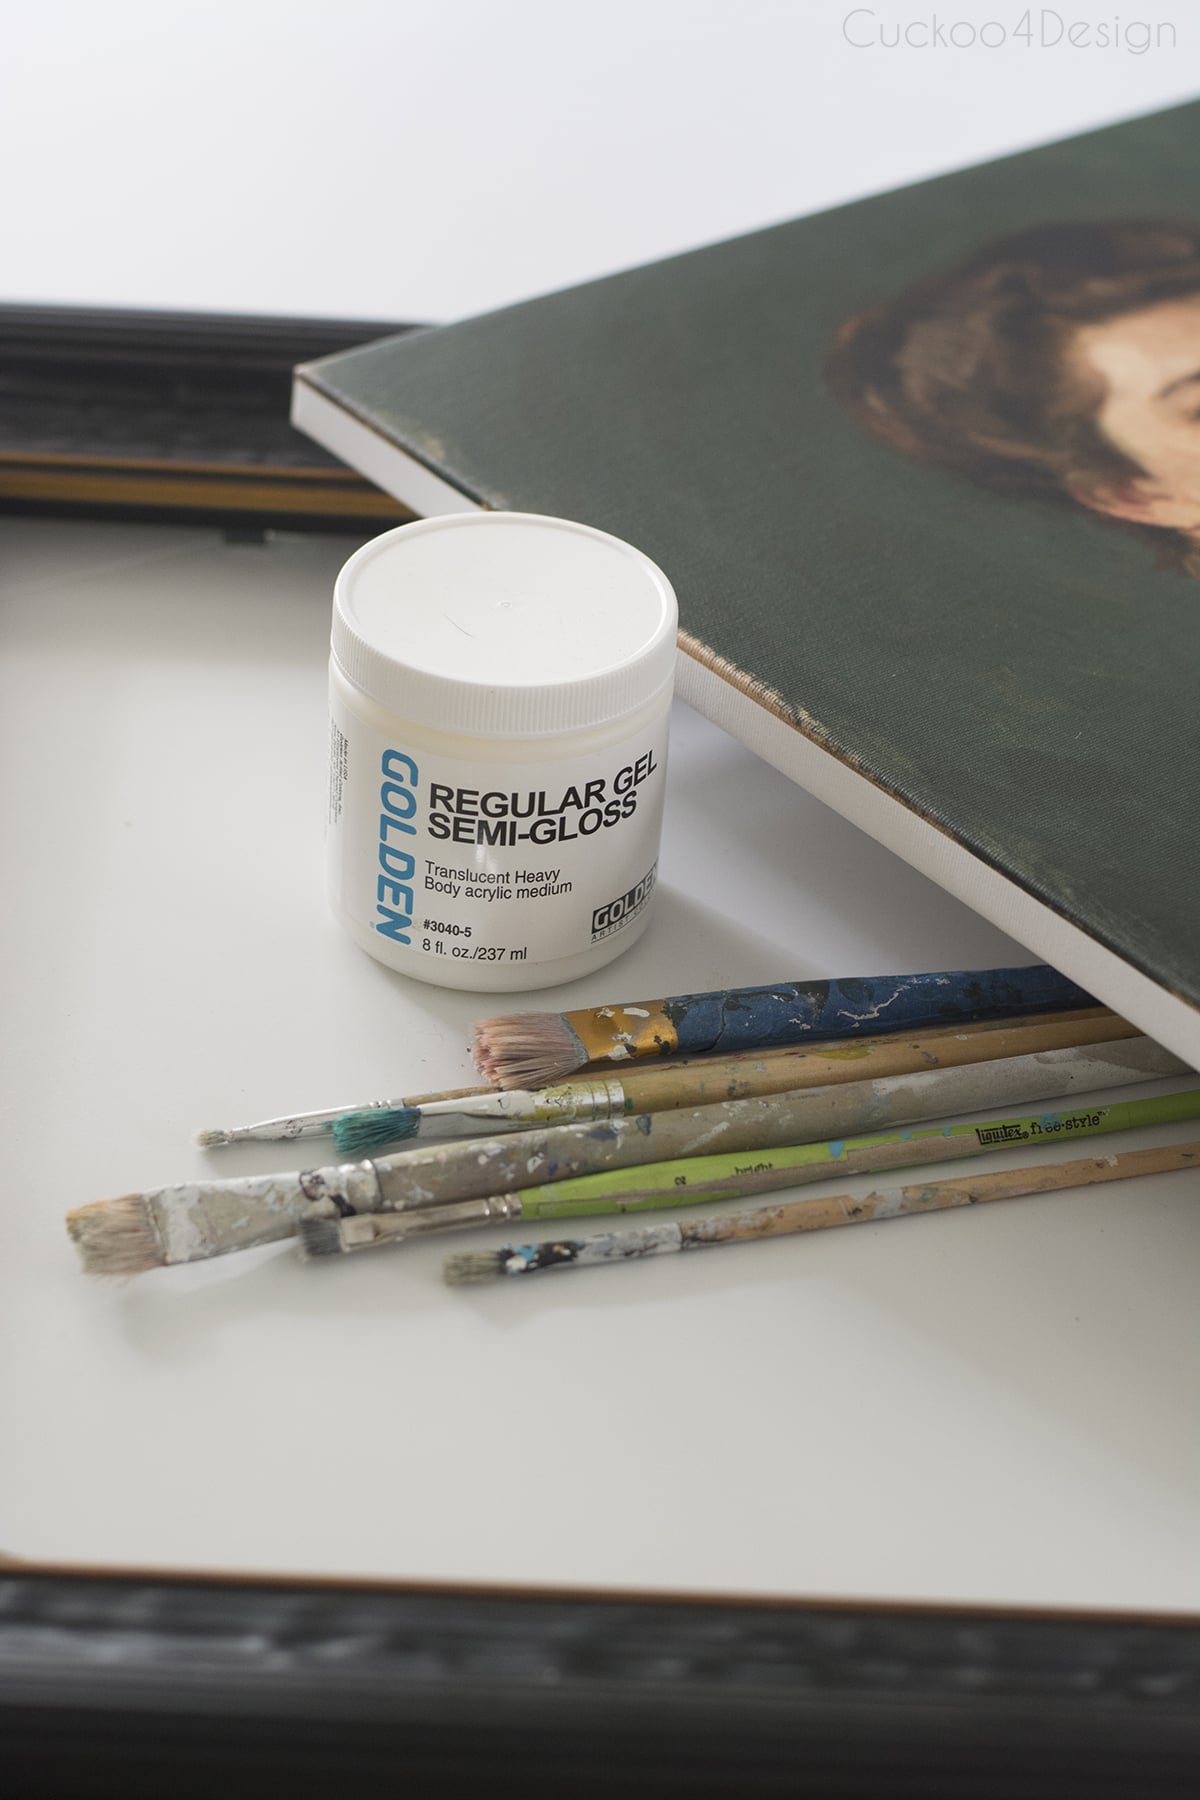
- matte or/and semi-gloss gel medium
- matte mod podge
- decoupage toolset
- foam board, poster board, cardboard, or canvas panels in various sizes (I used 8×10, 5×7, and 4×6 canvas panels because those are the frame sizes I have)
- scissors (or utility knife)
- polycrylic spray
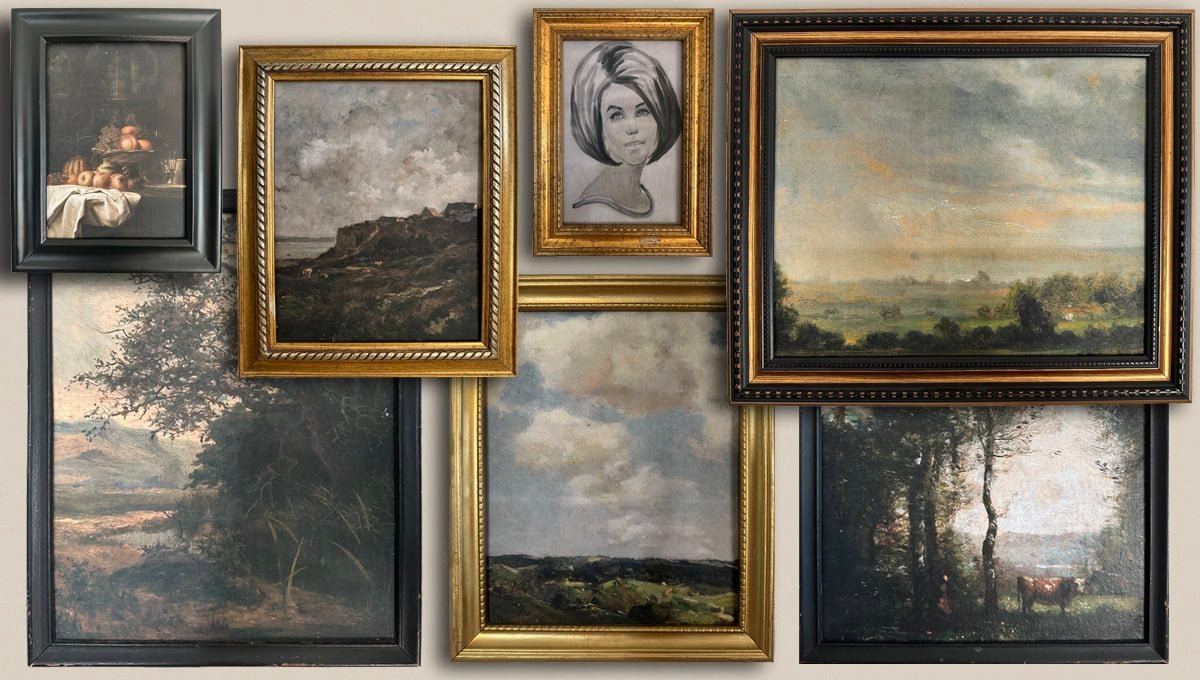
Here are some of my favorite landscapes and still lives:

Video instructions
I added a video tutorial so you can watch what I did to make a print look like a painting instead of reading about it. As always, you can also watch the video on my YouTube channel if it doesn’t load for you on the blog.
Tips and tricks before starting your art project
- You can find free downloadable art, but for some people who don’t know what they are doing when it comes to image resolution and such, it can be a bit difficult to find the right printable size, which is why Etsy can be a good solution. The images are usually already in different sizes for one digital download. It makes it a lot easier!
- You can pay to get the images printed at places like Staples or FedEx but I simply printed mine on our standard color home printer using cheap office paper and it worked great.
- You can use any backing you would like to glue down your printed art. I had the panels on hand, which is why I used them. But you can simply glue the prints to cardboard or foam board with standard craft glue as well.
- You can use Mod Podge as the top layer as well, but I prefer the gel medium, which helps create a nicer texture.
- You can photograph an original artwork and print it. I have done that with my mom’s and great-grandmother’s painting to get replicas for our house.
- You can get the images printed on canvas to give it an even more authentic look the way I did with my great-grandmother’s portrait, but that is, of course, adding extra cost to the entire project.
Where to find free digital downloads in the public domain
Step-by-step instructions
Step 1: Print images (OPTIONAL: seal printer ink)
I have tried both to print them at home on my printer and to have them printed at Staples. I was just as happy with the ones printed at home for free, so if you have a color printer that works at home there is no need to go and pay to have them printed.
However, I found it necessary to seal the ink if I printed them at home. It’s an extra step that I don’t want to skip just in case because the printer ink has bled together before when adding the wet top layer that makes them look like paintings.
I laid the prints on a protected surface and sprayed a thin layer of the polycrylic on all of them. Let the sealer dry fully!

Step 2: Glue down prints
Cut your prints to size and then glue them to whatever backing you are using. You can simply use a glue stick or spray adhesive, but I prefer to Mod Podge them to the surface. It’s an extra step that I like taking to avoid air bubbles and such later when adding the topcoat layer.
I used a paint brush to spread a thin layer of Mod Podge on a canvas panel and then carefully laid a paper print that matched the size onto the panel. Then I used the decoupage toolset to press down and flatten the print to avoid wrinkles and bubbles. Some of the excess glue will squirt out on the sides so have a rag or paper towel ready to wipe as needed. If you aren’t careful, the paper can tear, so be gentle with the roller and squeegee tool.

Let the glued print dry fully, no matter what method you used to glue them down. As you can see in the photo below, they already look great after I used the Mod Podge to glue them down before adding the top textured layer.

Step 3: Add textured brush strokes to the front of the image
Now let’s get to the faux oil painting technique, which is the fun part! Both the matte Mod Podge and the matte acrylic gel medium work as a top coat. I personally prefer the heavy body gel medium in a matte finish to give the canvas the look of the texture of an original oil painting. But you can certainly use ModPodge as well in either matte or semi-gloss.

Take a look at the brush details in your print and pick a brush size according to the brush strokes in the image. Don’t use a giant brush if the original painting has lots of details that were painted with a small brush.
I applied a generous layer of the gel medium with random brush strokes while using the image details as a guide. Don’t overthink it. Be careful, though, when you apply the gel medium too thick, it can dry white in some areas.
If you use a semi-gloss gel medium or ModPodge, keep in mind that the light will reflect in some areas due to the shine and make the texture even more visible. Some might prefer that over the matte!


Step 4: Add the dried finished piece of art to the frame
I simply plopped the dried piece of art into the vintage frame without the glass it came with. Original oil paintings are never framed with glass. Removing the glass makes the faux painting look even more authentic.


Here is the buffet area with my DIY fluted lampshades before adding any artwork. As you can see, I have this really large authentic oil painting that I bought at an auction 26 years ago. I still love it so much, and it really goes well with my new DIY art.

And here is the arrangement with my DIY creepy Halloween art before I changed out the artwork inside the frames.

And here is the same gallery wall with my framed reproduction oil paintings.

Also, check out how I made the DIY fluted lampshade and the DIY pendant light with jute yarn that you can see in the mirror reflection. Or how the painted buffet transformation in a blush color.

Tschüß,

Materials
- various sized brushes
- thrifted frames
- cheap or free prints
- matte or/and semi-gloss gel medium
- matte mod podge
- foam board, cardboard, or canvas panels in various sizes
- polycrylic spray
Tools
- decoupage toolset
- scissors (or utility knife)
Instructions
- Print images (OPTIONAL: seal printer ink)
I have tried both to print them at home on my printer and to have them printed at Staples. I was just as happy with the ones printed at home for free, so if you have a color printer that works at home there is no need to go and pay to have them printed.However, I found it necessary to seal the ink if I printed them at home. It’s an extra step that I don’t want to skip just in case because the printer ink has bled together before when adding the wet top layer that makes them look like paintings.I laid the prints on a protected surface and sprayed a thin layer of the polycrylic on all of them. Let the sealer dry fully!
- Glue down prints
Cut your prints to size and then glue them to whatever backing you are using. You can simply use a glue stick or spray adhesive, but I prefer to Mod Podge them to the surface. It’s an extra step that I like taking to avoid air bubbles and such later when adding the topcoat layer.I used a paint brush to spread a thin layer of Mod Podge on a canvas panel and then carefully laid a printed image that matched the size onto the panel. Then I used the decoupage toolset to press down and flatten the print to avoid wrinkles and bubbles. Some of the excess glue will squirt out on the sides so have a rag or paper towel ready to wipe as needed. If you aren’t careful, the paper can tear, so be gentle with the roller and squeegee tool.
Let the glued print dry fully, no matter what method you used to glue them down. As you can see in the photo below, they already look great after I used the Mod Podge to glue them down before adding the top textured layer.
- Add textured brush strokes to the front of the image
Now let’s get to the faux oil painting technique, which is the fun part! Both the matte Mod Podge and the matte acrylic gel medium work as a top coat. I personally prefer the heavy body gel medium in a matte finish to give the canvas the look of the texture of an original oil painting. But you can certainly use ModPodge as well in either matte or semi-gloss.Take a look at the brush details in your print and pick a brush size according to the brush strokes in the image. Don’t use a giant brush if the original painting has lots of details that were painted with a small brush.
I applied a generous layer of the gel medium with random brush strokes while using the image details as a guide. Don’t overthink it. Be careful, though, when you apply the gel medium too thick, it can dry white in some areas.
If you use a semi-gloss gel medium or ModPodge, keep in mind that the light will reflect in some areas due to the shine and make the texture even more visible. Some might prefer that over the matte!
- Add the dried finished piece of art to the frame
I simply plopped the dried piece of art into the frame without the glass it came with. Original oil paintings are never framed with glass. Removing the glass makes the faux painting look even more authentic.

Notes
Tips and tricks before starting your art project
- You can find free downloadable art, but for some people who don’t know what they are doing when it comes to image resolution and such, it can be a bit difficult to find the right printable size, which is why Etsy can be a good solution. The images are usually already in different sizes for one download. It makes it a lot easier!
- You can pay to get the images printed at places like Staples or FedEx but I simply printed mine on our standard color home printer using cheap office paper and it worked great.
- You can use any backing you would like to glue down your printed art. I had the panels on hand, which is why I used them. But you can simply glue the prints to cardboard or foam board with standard craft glue as well.
- You can use Mod Podge as the top layer as well, but I prefer the gel medium, which helps create a nicer texture.
- You can photograph an original artwork and print it. I have done that with my mom’s and great-grandmother’s painting to get replicas for our house.
- You can get the images printed on canvas to give it an even more authentic look the way I did with my great-grandmother’s portrait, but that is, of course, adding extra cost to the entire project.