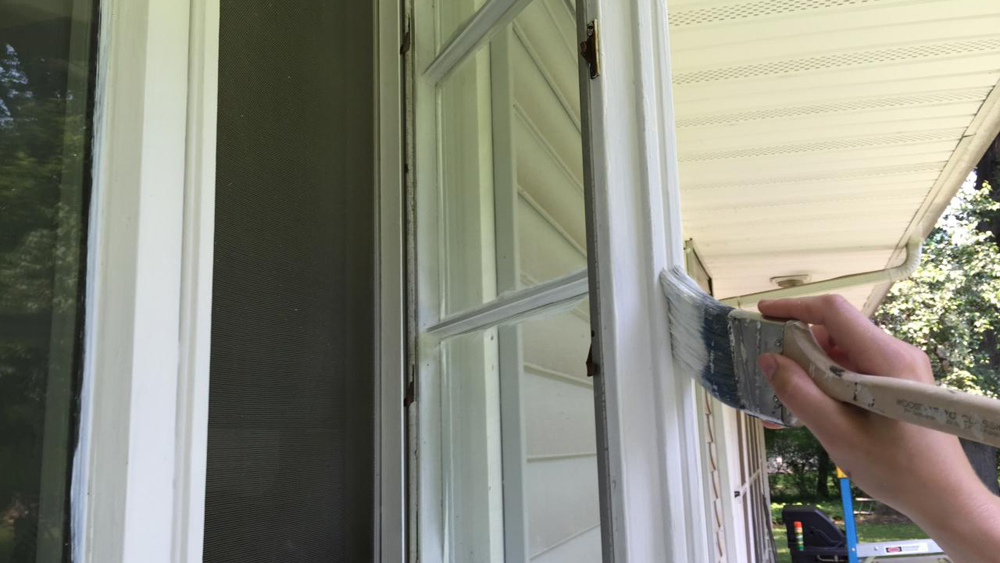
In this project we will explain how to paint casement windows and why we paint casement windows in the order we do and the reasoning behind the processes.
There is a logical process to the order in which you paint a casement window. The idea is to start with the areas that are only visible when the window is open, and to finish with the surfaces that will be seen and/or exposed to the weather.
Painting a casement window is really just a matter of common sense – as is painting all opening frames: doors, garage doors, sash windows etc, all have an order they are best painted in and our related projects at the end of the page you will find other tutorials to cover those jobs.
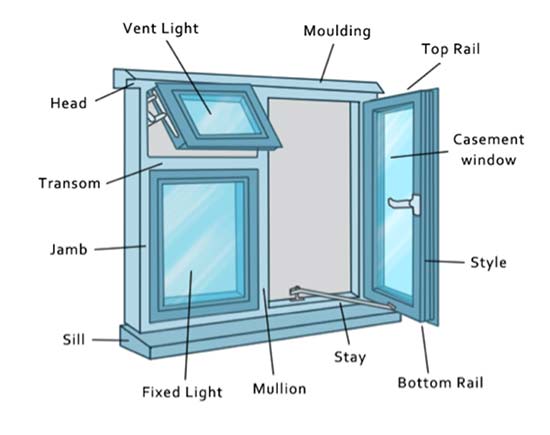
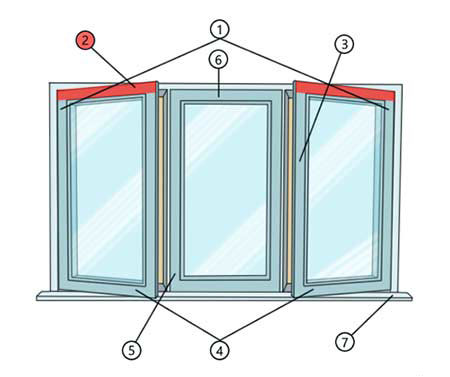
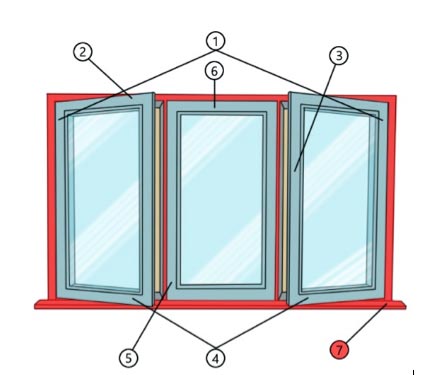
If you are not familiar with the terminology for the component parts of a casement window then take a look at the diagram below and for more information see our project covering the different parts of a window.
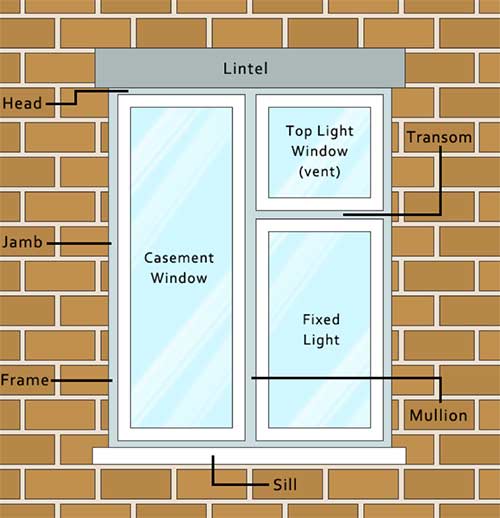
Parts of a window terminology
Tools for Painting Windows
If you have a steady hand you can just paint using a small brush, or you can use masking tape to give you a straight edge. However, as we mention in our other “painting a window“ projects don’t be afraid of getting a little paint on the glass. We have a magic tool for removing this extra paint, more on this later.
- Small brush (12 to 25mm (1/2 – 1 inch))
- Paint kettle
- A detail sander, heat gun or paint stripper (see explanation below)
- A range of sandpaper (from 80 to 100)
- Primer (and possibly undercoat)
- Topcoat paint/gloss
- Ladder
- White spirit
- Brush cleaner (if using solvent-based paint)
- Waterproof gloves
- Dust mask
- Eye protection
- Rags
How Often Should I Paint my Wooden Casement Windows?
Wooden casement windows need to be painted regularly to protect the wood from the elements. The regularity of repainting will vary depending on the climate where you live, the level of exposure your property gets to wind, rain, strong sunlight and even salt if you live near the coast.
In essence, if the paint becomes damaged e.g. starts cracking, peeling or flaking and allows the elements to access the timber below then it’s time to repaint.
In terms of what paint to use for casement windows, not all paints are equal in quality, some give guarantees of how long they will last, budget brands may not be as hard-wearing – check the tins and manufacturers recommendations for further information on this.
Casement windows can be constructed of different type sof timber. Softwoods are more vulnerable to moisture than hardwoods, some hard woods are extremely resistant to water and may only need to be oiled rather than painted.
Note: If your casement windows are currently oiled they can be painted, but once painted if you wanted to go back to oil you would need to strip the paint off right back to the wood.
As in all other painting jobs, preparation is the most important part of the job! The overall finished job will never be great if the correct preparation has not been done in the first place.
It is easier to paint the outside of your windows separately to painting the interior, and you should obviously choose dry weather, but it is best not to paint in a heatwave either as the paint can dry out too quickly.
Preparing Wooden Windows for Painting
As mentioned, preparation before painting is the most important part of decorating any woodwork in order to get a good professional finish.
While you can get away with a quick sand and applying a top coat to freshen up internal woodwork, it is very important that you spend time and effort preparing wooden windows for painting so that they do not have a large build up of paint that will prevent them opening and closing, and that they are properly protected from weathering so you don’t have to do the job more frequently than necessary.
As with everything in the building Industry, the best job will only be achieved after the best preparation so sand your window down well then brush away, or even hoover away all of the dust.
The surface of each layer should be allowed to dry between coats and then should be lightly sanded with fine sandpaper before applying the next layer of paint.
Step 1 – Removing old Paint
If there is a large build up of paint on the windows, then they should be stripped back to the wood.
This can be done using a heat gun or chemical stripper, but we would recommend using Homestrip which is a non-toxic, non-corrosive, paint and varnish stripper that will easily remove layers of paint without causing harmful fumes or residue. See our paint stripping project here for more information.
You could take care when removing lead paint as burning or sanding this can lead to ingestion of fumes or dust – see our Stripping lead paint project, to find out how to identify and deal with lead paint.
If you are using a heat gun you must be careful not to crack the glass with the heat, or scorch the wood, and once you are finished scraping off the paint you should sand down the timber ready to start priming.
If you are using a chemical stripper or Homestrip, wash down the woodwork in accordance with the manufacturer’s instructions so that no residue if left that could affect the final finish.
Step 2 – Providing a Key for Painting
As long as your windows don’t have a build-up of old paint and the current paint is in reasonable condition you can sand down the windows to provide a good surface for the new paint to adhere to, this is known as a “key”, a slightly roughened surface that the new paint can “stick” to in order to bond properly and not peel off.
Providing a key is an essential part of painting any surface including bare wood. You can sand down the window in any order to suit you, just make sure that you work logically so that you don’t miss any areas.
Once this process is completed wipe down the whole window with a lint-free rag dipped in white spirit or wash down with sugar soap.
A lint-free rag is one which does not leave fibres behind it when it is rubbed on the woodwork, and the white spirit helps to grab the dust and remove any grease which would prevent the paint from properly adhering to the window frame.
You need to work in a well-ventilated area when using white spirit – but hopefully you have the window open while you do this. You should also avoid eating or drinking while you are working with white spirits to minimise ingestion.
Step 3 – Start With Primer
Primer is a special type of undercoat paint which helps the topcoat of paint adhere to the wood much better than it would if it was just painted directly onto the bare wood. It binds better to the wood and helps fill in imperfections giving a more stable and even finish once the topcoats are applied.
Wood is a porous material which is not water resistant, this makes using a protective layer of primer essential.
Also, the primer helps ensure that the top coat of paint does not dry out too quickly, without a primer the solvents from the topcoat paint can absorb into the wood and affect the curing process, which in turn can affect the durability of the paint.
Primers are usually white, grey or brown. Use a white where your top coat is white or light-coloured. Grey primers are good for dark greys, greens and blue colours, brown is good for reds and deep browns. Some manufacturers will recommend a particular colour of primer – so just check the tin.
You should also check the paint tin to find out what the manufacturer recommends is the best time between allowing the primer to dry and applying the topcoat to ensure the best adhesion and finish.
Step 4 – Use Undercoat (or not)
Traditionally when preparing wood to paint in the UK, from bare wood we use a coat of primer, a coat of undercoat plus one or two layers of gloss or other topcoat.
The primer provides the bond to the bare wood, the undercoat provides a good even surface for the topcoat and can be coloured to suit the finish colour which cuts down on the number of topcoats that are needed.
Some primers contain undercoat properties i.e. they fill minor imperfections and are coloured to suit the gloss or topcoat colour, which means that you do not need to use a separate undercoat.
Some modern paint finishes suggest only using primer and gloss and not using an undercoat, even on external woodwork.
You can even buy a product that is a combined undercoat and primer, and these are usually a good way of cutting down on the number of coats you need to apply to your windows, but just make sure you are buying a good-quality brand, particularly on exterior woodwork.
Where you are painting over existing paint in good condition you can lightly sand the surface to provide a key and treat the old paint as the primer and undercoat layers, or if you are changing to a dark colour you might undercoat in a darker colour before applying the top coat.
So, whether you use undercoat or not is part personal preference, part dependant on the condition of the existing paintwork, and part dependant on your choice of finished colour.
Whichever you decide, just make sure that you do use a primer if you are painting onto bare wood or where areas of bare timber are exposed.
Sequence for Painting Casement Windows
If you work in a logical order you can make sure that you don’t work over an area that you have already painted, which will minimise the risk of damaging the coat you have just applied.
Before we start this is just a note to make sure you put the paint in the right place. Don’t apply primer or undercoat to the glass, you can use masking tape to help you keep your paint in the place it is supposed to be – see our project on using masking tape.
Alternatively, you can use a small brush and a steady hand. Either way you should choose a brush about 12 to 25mm (1/2 – 1 inch).
Once you have applied the primer and undercoat you should allow the gloss or topcoat to overlap onto the glass to seal the edge between the wood and the glass and prevent water seeping into the joints.
If you get any unwanted splashes or “overpainting” onto the glass you can let the paint dry and then scrape it off with a blade – it is very easy to do this with a paint scraper designed for the job.

Stages of painting a casement window
How to Paint Casement Windows
All the different parts of a window that need painting
As we have mentioned, painting windows is really a job for a dry day so bear this in mind as the windows themselves will need to be opened and wet paint doesn’t do well when rained on!
One very important point to note is that before you close any painted windows you have to ensure that the paint has fully dried as if it hasn’t, once closed the paint will fully dry and stick the windows closed. If this happens they can be a nightmare to get open again!
Before you Start
Remove all of the window furniture. Use a small good quality brush (see our types of paint brush project here) about 12 to 25mm (1/2 – 1 inch), and make sure that whatever you use to stand on to reach the higher parts of the window is safe and secure.
Even a large window will not use a lot of paint so tip some of your paint into a small paint kettle with a handle which will make it so much easier to handle.
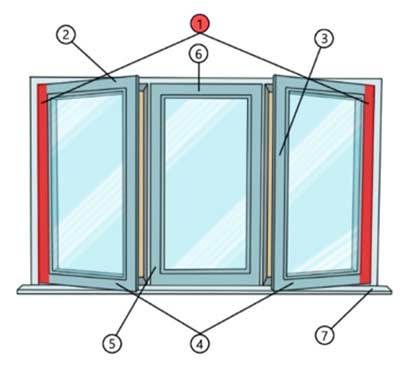
Step 1 – Paint Opening Sections
Always paint opening sections of any window first. The frame is the last thing to be painted. We always start with the hinge edge of the window (1).
Paint window openings first
Then up over the top edge or top rail (2).
Painting the top rail of a casement window
Then down the front, or leading edge, (3).
Painting down the front edge of the window
Before painting round underneath the window, on the bottom rail (4) back to the hinge side.
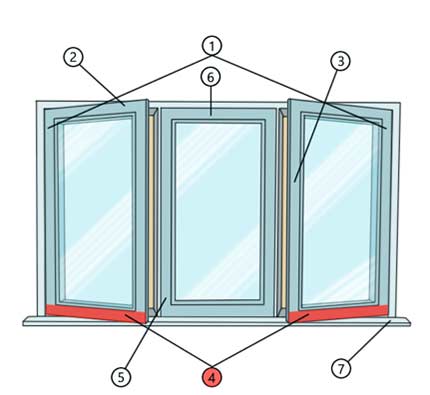
Painting down the front edge of the window
If there are two openers, do the same with both.
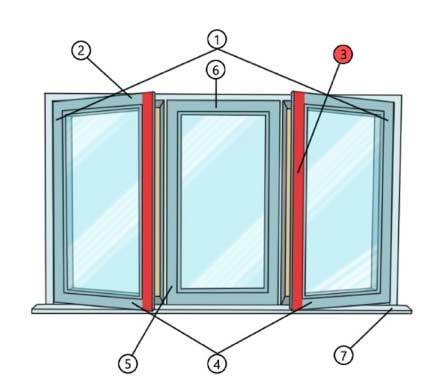
Step 2 – Paint Glazing Bars
Paint any non-opening sections (5) and (6).
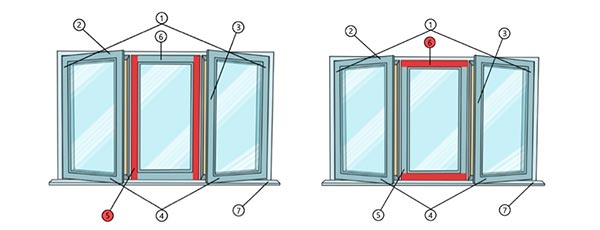
Paint any non-opening sections of your window
Paint any glazing bars by painting the left side of every vertical bar, then the right side of every vertical bar. Then the underside of every horizontal bar, then the top side. Finally paint the front of all glazing bars.
Step 3 – Paint Rails
Paint the stiles of the opening windows. (The bit that is exposed when you open the window – see the parts of window diagram above). Paint the hinge sides first, then the intermediary stiles, then the lock/latch side, then top and finally bottom sections.
Step 4 – Paint Window Frame
Paint the frame working from the left side up and over the top down the right and along the window sill or cill. The last bit to be painted is the underside of the cill or sill.
Paint the window frame starting from the left and working up
Final Points
These instructions may go against others you have seen but very few of them do it for a living! The underside of the cill is the least likely to be touched, leant on or rained on so it should be the last to be painted because then, it will be the last to dry.
Make sure you remove any masking tape before the paint has fully dried to avoid pulling off the paint with the tape.
Finally use a window scraper, as pictured below, to clean off any unwanted paint on the glass. See our painting sash windows project for instructions on how to do this effectively and neatly.
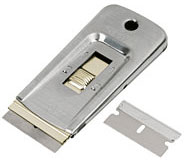
Use a window scraper to scrape the paint off neatly
Painting Metal Casement Windows
Did you know that you can also get metal casement windows? If not, then yes you can!
Although the above steps and processes are aimed at painting wooden casement windows, if you have any metal casement windows that need painting, then the steps, processes and reasoning for doing so is exactly the same as for wooden casement windows.
If left exposed metal can rust so it also needs protecting with a coat of paint. That said, most metal casement windows are galvanised so technically they shouldn’t rust, but if left bare, old metal casement windows can look ugly and unsightly so a nice coat of paint goes a long way into brightening them up.